Tuesday, December 25, 2012

Best Wishes for a Safe and Peaceful Holiday


We are having a white christmas and I can't wait to strap on the snow shoes and get out on the trails.   After the holiday commercialism I need to get back in touch with the things that really matter.
Peace to all.


Wednesday, December 19, 2012

My Peacock Won an Award!

With Eyes Like Diamonds in the Sky
Several months ago I completed this beaded embroidered piece for a beading challenge with my fibre arts group (Out of the Box) and Canada Beading Supply.  We were given a bag of beads and silk threads and we needed to use them in the piece.  I stitched this peacock on a black background.    All the works are presently displayed at Canada Beading Supply, 210 Colonnade Road, Unit 12, Ottawa, and will be there for several months.  It is an amazing exhibition of bead and threadwork.  If you are in the Ottawa area be sure to drop in.  After the exhibition the pieces will be auctioned off to support the Heart Institute.

Visitors were asked to vote for their favourite piece.   On Monday I was notified that I won!!!    It was a tie.   I share the honour with MaryAnne Toonders and her beautiful piece called City of Gold.

It was a lovely surprise and a nice way to end 2012.   The prize is a gift certificate for Canada Beading.   How yummy!

Tuesday, December 18, 2012

With Heavy Hearts

I have not felt like posting in the last few days because  my heart is heavy with grief for the lives lost in Newtown and their families and friends.  I'm sad for the survivors who witnessed such an atrocity.  My grief is mixed with anger at the waste of so many lives.  As a Canadian, I find it all so difficult to comprehend and can only hope that something is learned from this tragedy and it becomes a motivator for change.

Wednesday, December 12, 2012

The Pickle Dish - a New Quilt Shop in Carleton Place

We are always excited to see new places to find fabric in the Ottawa area and yesterday I visited The Pickle Dish, a new quilt shop and studio on Bridge Street in Carleton Place.    Owner Jan Kittle has lots of yummy fabric and threads, long arm machine, and offers classes in a warm cheerful shop.   The walls are decorated with lovely fabric art.    My fabric bookmarks and new fabric landscape pins are also available at her shop.  For more information go to   www.thepickledish.ca

And of course I had to purchase fabric.....

The colourful one is for another 60s piece I am working on - all about the passage of time....

I'm also happy to say that another Goddess doll has found herself a new home.  This time it's 'doll with shocking pink hair and extensions' that has moved on, hopefully to spread comfort and joy.


Friday, December 7, 2012

Tutorial for Fabric Landscape Pins


This is still a work in progress for me to find the best way to make fabric pins - I'm thinking about mounting them on tiny pieces of wood for example - but for now here is how I make them.

I complete each one individually so I start by fusing steam a seam 2 lite to the back of a bunch of fabric (quite often I just use scraps of fused fabric that I have left over from other projects).  I cut up several small (2" x 1.5", 2" x 2", 2" x 1.75" etc) rectangles from a piece of interfacing or craft bond that is fusible on one side.  This will be the backing for each tiny landscape.
I cut out tiny pieces of sky, hills, fields, flowers etc one at a time, with very sharp small scissors. Starting with the sky and working down, I place them on the piece of interfacing (on the side which is not fusible because my fabric is already backed with fusible).  Once they are all in place and to my liking, I iron them down gently.  I use a non stick sheet or paper backing from the fusible underneath because, remember, the back is sticky.
iron carefully so you don't dislodge the pieces

the sticky side


I trim the edges to the desired size with my rotary cutter.  Oops.  This one is still a little crooked.

For the next step I want to prepare the felt layer and the backing.   In the end there should be a fabric layer, interfacing, felt and fabric backing.  So I fuse backing fabric to pieces of felt.
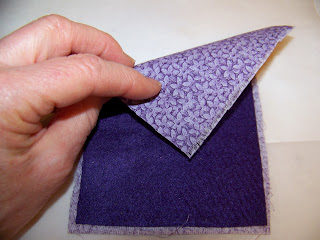

Then I lay out the landscapes on the felt side making sure there is enough space between them because I want the felt to show at the edges for a picture frame effect.  I iron them down because they are easier to cut afterwards.  I actually cover them with a piece of paper or my non stick sheet because I don't want any gunk from the iron to end up on the pieces.  I wondered if the fusible on the back of the interfacing would still fuse to the felt since it had already been ironed once when I fused the landscape to it.   In the first batch I made it worked fine.  However, this time some of the pieces started to lift from the felt.   So I added a thin layer of  Hi Tac Craft Glue and that seemed to do the trick.  In fact if your interfacing or other backing material is not fusible you just need to add a layer of fusible web to the back of it before ironing.  Or like I did, just glue it down to the felt.


Next, I cut them apart and trim them leaving a 1/8" border of felt.  Make sure your rotary cutter blade is sharp because it has to cut through all four layers.

And here they are - but there are still two more steps.
I painted a thin layer of Matte Gel Medium to the face of the pin to give it some protection and keep the fusible from lifting.  


careful not to paint the felt edge
And voila, I have a pin - all ready to attach a metal pin back - the most tedious and time consuming part of the process.   I sew the pin backs on because I don't quite trust using glue.   If I am ignoring a more obvious way of doing this please give me your ideas.
I hope my instructions were clear enough.   I'd be happy to answer any questions about the process.

Thursday, December 6, 2012

Two More Goddesses Completed

Here are my latest goddesses completed.  I especially love the red hair because it took sooo long to produce that curly look (no I didn't use tiny hair rollers or give her a perm)

I
I had used two ply yarn because I didn't have any fancy curly stuff in that colour and I wanted her to be a redhead.   Then I unwound each strand to make it curl......if there was an easier way I wish someone would let me know.  But in the end I loved the result.   Her hair really puffs out.  For the  next girl I gave some shaggy bangs.  I used silk threads for her hair but maybe that was a mistake because it does shed a bit and the hair looked a little thin and limp so.....

 I braided in some hair extensions in different colours.   There is one at the front as well.
And I guess I forgot to mention in my last post that the backs of the dolls are all different patterned fabric. So here is a back view.
Now on to making more pins.   This time I'll take photos as I go.

Tuesday, December 4, 2012

Introducing The Goddesses


Meet my goddesses!
A couple of years ago I started making goddess dolls for friends - especially those who were going through tough times and needed support.  I embroidered words of encouragement on them and dressed them up with flowers and vines.  After getting some feedback and hearing how they really helped them to get through the worst times, I decided I should make more.     These three girls went to a craft show last night and my lovely yellow tulip goddess went home with a new friend.  I hope she helps.


 Here are close ups of the embroidered tulips and words of encouragement - and her cool hair.


Coral goddess has lots of attitude too.

She is embroidered with vines, hearts and flowers.

And finally lavender goddess especially made for those friends who have lost a breast to cancer.  She has lots of heart and her basket is overflowing with abundance.


I have a couple more that are not quite finished.   They do take a long time to stitch.  I need to tweek the design a bit to make it easier to stuff and stitch.  I'd like to make them more 'traditionally built' ie more full bodied.  

I have also designed some tiny landscape pins and they sold well at the craft show last night.  I wanted to post a tutorial but didn't take enough photos along the way (because I wasn't sure they would work out).  I'll try to remember to photograph the next one I make and then I can do a 'how to' post.    Here is a photo of the finished ones.